:~)

nails & whales

More whales needed.

Facts. I'm tired, uninspired, and can't stop thinking about all the studying I should be doing despite losing so much intrinsic motivation.

Paste in requisite disclaimers of not having done any real nail art in nearly a year, being too lazy for proper photos, etc. etc. I also still don't know why Blogger downsamples my photo despite manual resolution adjustment in CSS.

But look, a holographic gradient! Coupled with an elongated almond nail shape and an accent piercing – really all you need as you flip through thousands of flashcards.

Products used (links are swatches):

  • Color Club Blue Heaven – baby blue linear holographic
  • ILNP Rosewater – silver chunky linear holographic with rose duochrome
Did you know that histidine is zwitterionic at pH 7?

:~)

There's a lot going on with this set.

It's a bit disjointed and there isn't really a coherent continuity across all four display nails, but I had to do some detail work after a half-year dry spell. If those roses look vaguely familiar to you, you're fantastic and I applaud you – they're largely inspired by this mani I did last fall semester. (Even if the actual brushwork didn't improve, at least the editing did, yeah?)

Those with peculiar dedication to my blog and a peculiarly strong memory will further recall that I also did another big cat mani in January 2015; these are inspired by the same nail tech (nailsbyly), albeit leopard instead of tiger.

It's a good day for nail art when you've done all the intricate nails before.
Okay, maybe I should've manipulated the blue curve a little better in Photoshop. Or just used Lightroom.
I do regret that the color palette for the roses wasn't better integrated into the set, but I'm still fairly happy with how they turned out. An incredibly cathartic twenty-minute break from MATLAB... (Yes, twenty minutes for a singular nail.) Also got to experiment with simplistic negative space for the first time in nearly two years, which was neat!

Aaaand back to monochromatic talons I go, as organic chemistry labs have a tendency to douse everything in acetone. Throwback to that one time I wore Illamasqua's Phallic on my right hand and ended the day with cobalt pigment streaks down my fingers.

Products used (links are swatches):
  • Color Club Blue Heaven – baby blue linear holographic (first ever blog post! ew)
  • Essie Mint Candy Apple – pastel mint crème
  • Zoya Trixie – silver foil
  • China Glaze Fairy Lights – clear fine holographic glitter topcoat
  • Sally Hansen Hyp-nautical – teal-tinted Mylar/glitter topcoat
  • Various acrylic paints + a tiny, tiny #00 paintbrush
As always, thanks for reading :•)

Yet another two-month hiatus – good work, Bethany.

I'm blaming work (i.e. endless crying over MATLAB) for this one. But, with four days left of my internship and half a month until I move back to Providence, I've found myself suddenly motivated to post & design new art as a last hurrah of sorts.
Why are my photos still uploading blurrily...? Manual HTML adjustment isn't doing anything.
This is a look from early summer, immediately after the design from the last post. Minimalism (laziness?) is apparently my current theme – sub intricate detailed brushwork for a bit of metallic hardware and sparkle. Honestly, the coolest thing about this mani is the piercing... That's about it.

So, linear holographic pigment + smooth, smooth silver = a futuristic discothèque? Maybe. I don't think that's terribly far off, at least.
Gotta have a blurry shot to show that sunlit holo.
I'll leave this post pretty short; the compulsion to paint my nails is still MIA despite (halfhearted) efforts to muster it up for the past two months. The advent of school means that I'll have even less time to attempt new nail art, so let's hope the mani I'm working on right now (right now!) proves worthy of a post...

Products used (links are swatches):
  • L'Oreal Masked Affair – lavender-grey intermediate holo (neither linear nor scattered)
  • OPI Push and Shove – ultra-smooth silver chrome
  • Silver studs, clear Swarovski flatback crystals, a silver jump ring
Thanks for reading (especially if you're from my personal Snapchat) :•)
It's been four months since my last post. I promise it wasn't supposed to be this way; I had an entire schedule charted out, from Week 1 of second semester till the end. But spring semester proved a different creature from fall (thanks organic chemistry and Metcalf Research Lab!), and I fell behind only two weeks into the plan. At least my last post wasn't just a swatch...

That also means it's been four months since I've done any serious art. I vaguely remember (sans documentation) neon gradient tips for Spring Weekend and a mint-pink gradient for the end of the school year, but absolutely no detail work. There is a partially legitimate reason – in organic chem, we wash all glassware with acetone, which pretty much nullifies any possibility for intricate art. I once made the mistake of swatching Illamasqua's Phallic on my right hand... Pigment running down my fingers for days.


But that's all over now, and it's a little strange how anticlimactic it all is. A quarter of college done? Definitely doesn't feel like it.

Anyways. Nail art. After a third of a year without practice, it wasn't a surprise that I no longer had the finesse I did, and I was discouraged enough by the first two fingers that I just decided to quit while (relatively) ahead. My iPhone photography (lolol) and Photoshop photomanipulation have also suffered – they'll recover.


So, I'm not entirely sure what this is; vines and crazy glitter tips? If anything, we can appreciate the return to an almond nail shape, at least. If you really want to stretch things, stitch the two halves together into a metaphor for my freshman year. Fall was full of cautious and clean constants, and spring... chaotic. Plenty of new experiences, stochastic variability, and personal growth.

That was an awful comparison, but we'll go with it anyways.

To more nail art and more blog activity this summer!

Products used (links are swatches):
  • Zoya Heather – pale lilac creme with hidden silver shimmer
  • Color Club Sugarplum Fairy – dense lavender holo hex glitter
  • Phthalate green, ochre yellow, black, and white acrylic paints
Thanks for reading :•)

Currently listening to the Vitalic remix of Delta by C2C
So, Valentine's Day... I went to my lab at 11:00 AM, returned to my dorm at 12:00 PM, and have been eating continuously ever since while prepping this post. Not a bad day at all. My PhD student mentor/coworker bought some chocolates for the lab – we're pretty festive, I think.

I'm not all about Valentine's Day, but themed nails had to happen. And I'm pretty glad with how these turned out! This was my first experience with striping tape, and it most definitely won't be the last. (Especially when it's fuschia holographic...)


The rest of the nails were freehanded with normal nail polish brushes (not art brushes) – super easy and quick. Establishing the base was actually probably the most difficult part, as that light pink just did not want to even itself out. Patchiness for daaaays.

If you're wondering about my thumb, have a blurry shot:


"I am not displeased by your presence" was a bit too long, so this'll have to do. If you read this blog, though, know that I do love you and not just tolerate you. ;)

Products used:

  • Urban Outfitters Picnic Peach – peach-pink crème
  • Zoya Janel – cool red crème
  • Pure Ice Reddy-Or-Not – multi-sized fine red glitter in a clear base
  • Skin Food Sparkle Sun Yellow – ultrafine dense gold metallic flakes
  • Deborah Lippmann Boom Boom Pow – gold glitter in a clear base with 24k gold shimmer
  • China Glaze Fairy Dust – fine silver holo glitter in a clear base
  • Omega Labs Nail Glitter #117 – pink-green iridescent glitter
  • Swarovski rhinestones – 2.5 & 2 mm Crystal AB, 2.5 mm Crystal
  • Striping tape – fuschia holographic
  • Metallic studs – gold, matte gold
  • Black gel pen (I know, I know) 

Thanks for reading!

Bethany
Currently listening to A Month of Sunshine by Fever Dreamer

All products in this post purchased by the author. Photos taken with an iPhone 6s and color-corrected in Adobe Photoshop CC 2015. 


We're back to posting things that are still on my nails as I type! Miracle of miracles.

Not much of an intro for this one, because I have seven (7!) swatch shots of I Love Nail Polish Birefringence – and the only appropriate way to describe pretty much all of them is luscious.

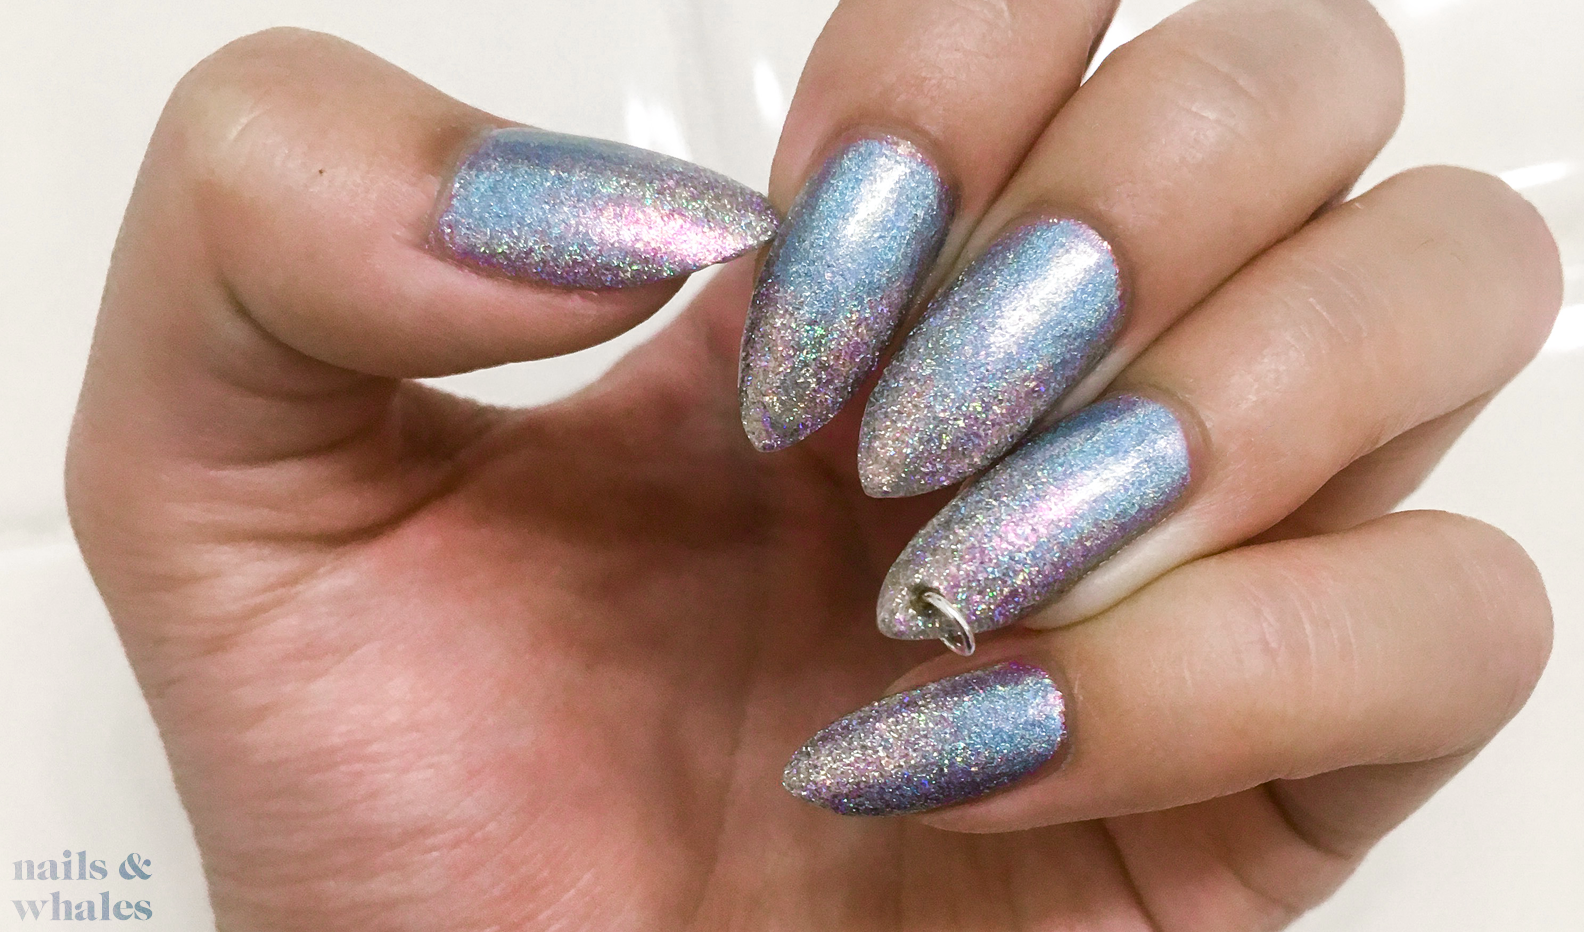
I don't have the words for this. Which is both beautiful and terrible, as I'm trying to write a review. Honestly, I'm not even sure how I'd fully describe the color... Purpley-blue with green-yellow-orange-red-pink at the far edges?


You'll see that I'm not wrong, even though I hit just about every wavelength in the spectrum.


ILNP Ultrachromes are a cult fave amongst indies, and I am so on that hype train. I impulse-bought Birefringence when it first came out as one of the original four Ultrachromes; it was my first ever indie polish. The dedication is real.


Most polishes shift colors under different types of lighting (natural, fluorescent), but this is the only one I have that truly shifts color and finish under different luminance levels. The first two resemble encapsulated silk in purple-blue; the next two read a bit more cyan metallic.


The shimmer is insane in direct sunlight. You also start seeing these little teal-green metallic particles you never would've noticed in indoors light, and you begin to wonder how many different looks this one shade can take on.


And, of course, the underwater shot. Multichromes are notorious for showing their full potential under water, and Birefringence is no different. That oil-slick shift. I've gotten by far the most compliments on this polish when worn plain, and it's not difficult to see why.

I Love Nail Polish Birefringence

Price: $12.50 via their website 
Size: 12 mL (standard)
Finish: Insane ultrachrome that shifts from metallic to pearlescent
Formulation: 3-free
Application: Very unproblematic. I'm wearing three easy coats sandwiched with Essie Ridge Filling base and Essie All-In-One base (as topcoat). 
Brush/bottle: ILNP has changed their bottle shape since I purchased mine (round to square). The rubberized caps are nondescript but functional and the brush was very easy to work with, though I've forgotten exactly what it was like. 

Overall: Do I have to put anything here? I love it. I love it so much. I'm going to buy more.

If you didn't believe in the multichrome nature of this polish, have a blurry airplane shot I just had to take en route from CA to RI.


What other polish does that?

Thanks for reading :•)

Bethany
Currently listening to Sunday Candy by Chance the Rapper.

All products in this post purchased by the author. Photos taken with an iPhone 6s and color-corrected in Adobe Photoshop CC 2015. 

I've got a few looks from the end of summer and fall semester to post... This'll probably be a quick series without much captioning – let the designs speak for themselves!

This one's particularly atrocious, I know. The other posts from the late series weren't themed, so they could technically have gone up anytime and no one would've known any better. Except for maybe nail shape.

Well?

Too bad. By now, you know me better than to expect anything else.


As you've probably figured our, I have my look from the 2015 holidays today. I try to do a themed winter look every year, and I think this is my favorite yet. That index nail may be a little out of place, but I didn't care anymore after at least four re-dos – just appreciate the sterling flakes and holo gradient.

The middle two nails, though... The backdrop is inspired by a beautiful night sky set I saw on Tumblr (unfortunately I don't recall who originally did them), with an additional reindeer for that ***holiday*** spirit. And Mylar on the pinkie. What can go wrong with Mylar?

Because I only have one photo of this one, let's take a fun commemorative trip through the past four winter manis. I've got a lot to thank the nail gods for...


2011 – Ah, Essie Pretty Edgy. My first "nice" polish, and I would've still loved it if it hadn't turned into a gooey mess at the bottom of the bottle. I also distinctly remember being so proud of that bow! It is a nice bow.


2012 – Three of my friends pooled money to buy me a Chanel polish for Christmas :') For this one, I remember being so extremely excited to receive the polish at school that I immediately went home and devised this glitterbomb with Graphite LOL. Good times...


2013 – Alright, we're starting to get real here (and mix nail shapes as I figure out my favorite). That gorgeous glowy blue-purple is ILNP Birefringence, which I'm currently wearing (still). Still like this one, I think!


2014 – Aaaand last year! This one's actually up on the blog here, as a half-hearted attempted at an NYE mani. Precise tapework, galaxies, piercings, and holo. And pointy stabby almond nails. Definitely one of my favorite manis!

I'm so glad I've learned since 2011, haha. Never been much of a cuticle painter, thankfully, but those cuticles (technically, eponychium) and nail shape were so awful. You gotta start somewhere, though...

For the 2015 iteration, materials used:
  • Floss Gloss Pony – neon pastel peach crème
  • F.U.N Lacquer Pay Day – fine sterling silver flakies
  • Color Club Blue Heaven – baby blue holographic
  • China Glaze All Wrapped Up – blue-purple smooth microglitter
  • China Glaze Dorothy Who? – sky-cobalt smooth microglitter
  • Wet n Wild Black Crème
  • Julep Char – dark navy crème
  • Zoya Sia – ultramarine crème
  • Essie Blanc – white crème
  • China Glaze Tart-y To The Party – lavender crème
  • Color Club [unnamed] – sheer neon blue jelly
  • Mylar film
Thanks for reading :') 

Bethany

All products in this post purchased by author. Recent photos shot with an iPhone 5s and iPhone 6s and color-correct in Photoshop CC 2015.